Recursive Data Structures
Practical examples of organizational hierarchy and inventory data structures
Published on March 19, 2007 by Jonathan StarkRecursive Data Structures
Have you ever called your cell phone from your home phone and answered your own call? It's pretty weird. That is an example of recursion. Our favorite example of a recursive relationship is from the movie The Terminator when John Connor sends Reese back in time, and then Reese ends up fathering John. That was cool.
Recursion is very powerful, but a little tough to get your head around at first. In this chapter we will cover a couple of typical recursive relationship examples so you will be more apt to recognize and handle them when they crop up.
Recursive Relationships
A table that relates back to itself is a recursive data structure. These are often called self-relationships, or self-joins. Just like any other kind of relationship, self-relationships can be one-to-many or many-to-many.
The classic case of one-to-many recursion is a company organization chart. If you have to keep track of who reports to whom, and each person can only have one boss, you would have one-to-many recursion. In this case, the boss would be referred to as the Parent Record and the people that report to that boss are the Child Records.
By comparison, imagine an inventory tracking system for a manufacturing company that makes water fountains. It would likely include a table for Parts that would have records for things like pumps, nozzles, hoses, gaskets, screws, fittings, etc... Some parts are more complex than others and are in fact made up of other parts.
For example, a Franzen Pump might contain a Biggens Hose. But the Biggens Hose is also part of the Klockstien Pump. So, you can imagine that users of this system might want to see related records from the perspective of either a hose, or a pump. This is an example of many-to-many recursion. In this case, the containing objects are parents and contained object is the child. Therefore you would say the Biggens Hose has two possible parents: the Franzen Pump and the Klockstien Pump.
One-to-many recursion is a little bit more straightforward than many-to-many, so we will cover that first.
One-to-Many Recursion: The Organization Chart
For the purpose of this example, imagine that you have to take the employee directory for a business called The Brazil Company and display it as an organizational hierarchy.
Figure 10.1 Employee directory of The Brazil Company
Your first thought might be to make tables for different types of employees, and then relate those tables together as displayed in Figure 10.2. This approach is not very flexible however, and changes in the organization would make it onerous to maintain.
Figure 10.2 Inflexible, non-recursive approach.
In general, anytime you find yourself creating multiple tables with nearly identical fields, you probably need to rethink your approach. Remember, tables represent types of objects (AKA 'Entities') and there should only be one table per object.
So, since the data you are tracking about Sales Managers and Operations Managers is the same (First Name, Last Name and Title), you should store them both in the same table. Furthermore, since the relationship between a President and a VP of Sales is basically the same as the relationship between a Sales Manger and a Sales Person, there is no reason to track them separately.
So, assuming that each person will only report to one person, and each person can have multiple people reporting to him or her, this situation calls for a one-to-many recursive relationship as modeled in Figure 10.3.
Figure 10.3 One-to-many recursion
Now the fun part - let's build it. First, we will modify the database structure, then we will create layouts to interact with the new structure.
All you need to do to the Employees table is add a field called ID Manager. This field will store the employee id of the person to whom the person in the current record reports.
Figure 10.4
Now that the ID Manager field is in place, jump into the relationships graph and create two new occurrences of the Employee table and connect them as shown in Figure 10.5. Be careful - it is easy to get the Parent and Children TOs names backwards. To keep them straight, think of each from the perspective of the Employee TO.
Figure 10.5 A classic one-to-many Relationship Graph
That is all you will need to do in Define Database, so let's build a layout that will allow you to display the structure you have just built. Create a new Standard form layout called 'Employee' that includes all of the fields from the Employee TO, and all the fields from the Employee to Employee Parent TO.
In Browse Mode, the result should look something like Figure 10.6. Now you can easily see to whom the current employee reports.
Figure 10.6
The next step is to add a portal that will display the employees who report to the current employee. Jump back into Layout Mode and drag out a portal that is based on the Employee to Employee Children TO. Include the First Name, Last Name and Title fields in the portal.
Back in Browse Mode, you can now see the direct reports for the current employee.
So there you have it. No big deal, right? At this point, you have created a layout that can effectively display the one-to-many self-relationship.
Figure 10.7
Now, let's make it more useful by adding some 'hyperlink' navigation. We will be making two scripts: one for navigating 'up' the tree to the manager, and one for navigating 'down' the tree to one of the direct reports.
The script for navigating up the tree is very easy because there can only be one target record:
Go To Related Manager Script
Go to Related Record [
    From table: 'Employee to Employee Parent';
    Using layout: 'Employee' (Employee)
]
Navigate back to the layout and attach the new script to a button in the Manager section. We will attach it to the ID Manager field label. To illustrate that the label is clickable, we have underlined the text.
Notice that we did not bother to check to make sure there was a related record. That is because if there is no related record, the Go To Related Record script step is smart enough to do nothing. This can be troublesome in other instances, but it is an advantage here.
The script for navigating 'down' the tree to one of the direct reports is essentially the same.
Go To Related Direct Report
Go To Related Direct Report Go to Related Record [
    From table: 'Employee to Employee Children';
    Using layout: 'Employee' (Employee)
]
In this case, we will add a little arrow button to the portal and attach the new script to it. Now that both scripts are attached, you can easily navigate up and down the tree. In fact, you can jump all over the place - it is quite useful.
Figure 10.8
Let's pause to get our bearings. We have done very little work so far, and we can already see why setting up a recursive data structure is so advantageous. Had we split our different types of employees into different tables, this tree navigation would not be easy at all. In fact, we would have had to make a different layout for each type of employee, each with its own portal, related manager fields and navigation scripts.
By the way, we realize that one might argue that creating scripts for this navigation is overkill when we could have just attached a Go To Related Record command directly to the two buttons. This is certainly a valid point, but in our experience you will eventually have to add more logic to the 'GTRR' behavior and would therefore end up having to make the script after all.
Assigning a Manager
We have not yet given the user the ability to assign managers or direct reports to the current employee. First, we will cover assigning a manager.
The simplest thing to do is just allow the user to type manager Ids into the ID Manager field. This would be fine if the user had all the manager Ids memorized, but we think it is safe to say that this is not normally the case.
Moving up the complexity ladder, the next option would be to create a value list of Manager IDs and attach that to the ID Manager field. This seems pretty quick, easy and useful, so let's try it.
First, we are going to have to create a calculation field that concatenates the employee first and last names so we will have something descriptive to display along with the Employee ID in the value list. We will call the field 'Last First' and it will format the data like so: 'Lowrey, Sam'.
Next, define a value list called Employee ID that displays the Employee ID as the first field and Last First and the second as shown in Figure 10.9.
Figure 10.9
Once the value list is created, attach it to the ID Manager field on the Employee layout as a drop down list. Now, clicking into the field displays a list of possible managers from which to choose.
Assuming the users of this system were infallible, this would probably be sufficient. If you are concerned that this may not be the case, you might want to take a close look at Figure 10.10 and try to pick out a potential pitfall of this approach.
Namely, that it is possible to select the current person as the manager of the current person. In reality it might be nice to be your own manager, but it is regrettably rare. We assume that in every case this would be considered an error.
Along the same lines, but much tougher to spot, is the fact that you could assign a direct report of the current person as the current person's manager. Or, a direct report of a direct report, etc... It is sort of like allowing someone to be her own great-grandmother. We will refer to this situation as an infinite loop, although in other circles (pun intended) it is referred to as a cycle or circuit.
Figure 10.10
Avoiding Infinite Loops
We are going to add field validation to the ID Manager field that will squawk when an infinite loop is created. In order to build the field validation, we are going to create a 'helper' field that we like to call Lineage Multikey. It will contain the ID of the current record, the ID of the manager of the current record, the ID of the manager of the manager of the current record, and so on.
Here is the calculation:
If ( IsEmpty ( Employee to Employee Parent::ID ) ;
    ID
;
    Employee to Employee Parent::Lineage Multikey & ¶ & ID
)
The formula begins with an If statement that uses the IsEmpty function to check to see if there is a parent record. If not, value of this field evaluates to the ID of this record. Otherwise, the value resolves to the Lineage Multikey of the parent record, plus a carriage return and the ID of the current record.
The result is that for any given record, you will have a value list of manager ids all the way up the chain until you reach a record that does not have one a manager. It is sort of like a script that loops through the records, but without a script. When you reach the top record, it's Lineage Mulitkey calculation processes the IsEmpty statement, evaluates to true, and just plunks in it's own ID. If it didn't, 'Employee to Employee Parent::Lineage Multikey' would need to evaluate, but can't because there is no parent record. Therefore, all the Lineage Multikey fields will have question marks (which is how undefined calculations are represented in FileMaker).
This sort of field is vital when working with recursive relationships. If it does not make sense quite yet, give yourself some time to play around with it and let it sink in. As you spend more time working with recursive relationships, this will become second nature. You will no doubt come up with a ton of nice variations.
Now let's create the validation that will prevent infinite loops. As we mentioned above, the If statement is what allows this calculation to resolve. However, this assumes that you will eventually get to a record that has no parent. If you don't, it will mean that you have assigned a manger to somebody that actually reports to her somewhere down the line. This will result in a question mark in the Lineage Mulitkey.
Knowing this, creating the validation on the ID Manager field is a simple matter. We don't want infinite loops, and we know when we have one because a question mark appears in the Lineage Mulitkey field. So, as long as there is no question mark in the Lineage Multikey field, the ID Manager value must be valid.
Here is the validation calculation:
Validation for field 'ID Manager' =
Lineage Multikey <> "?"
Now that we have some field validation in place, the users can't create an infinite loop. If a user selects a Manager ID that creates a loop, the field validation will force them to revert.
This is a pretty good solution, but getting that field validation error is annoying. Wouldn't it be better to only present the user with valid choices in the first place? That way they can't choose an invalid Manager ID.
You could use a filtered value list for this, but we think the best way to do it is with a pop-up selection routine. It gives you a lot of added flexibility, you don't have to muddy up the relationship graph, and we can repurpose it when we get to the next section on adding direct reports to the current employee.
Pop-Up Selection Routine: Select Manager
The concept here is that the user is sitting on an employee record - we'll call this the 'Active' record. When they click on the ID Manager field of the active record, a new window will pop-up that will present a list view of employees that are valid manager choices for the current employee. The pop-up window will be paused, so the user will be forced to make a selection or cancel before continuing. When they click an employee name, that employee will become the 'Selected' record. The routine will finish up by setting the Manager ID of the Active record to the ID of the Selected record.
The first step is to create a list view layout called Select Manager that has Last First and Title merge fields in the body section, and a global message merge field in the header.
There are three buttons: Cancel and Done in the footer, and an invisible button that completely fills the body section. See Figure 10.11 for an example of the completed layout.
Figure 10.11
All three buttons need to be set to Resume and they all call a script called 'BTN: Last Message Choice'. The Cancel button will send a script parameter of 'Cancel' and the other two will send 'Done'. Other than setting a global variable to the value of the script parameter and then resuming the script, the buttons do nothing. As we build on this script later in the chapter, the advantages of the architecture will become apparent.
Script definition for 'BTN: Select Manager'
 1 Allow User Abort [ Off ]
 2 Set Error Capture [ On ]
 3 Freeze Window
 4 #  Store the active emp id in a local variable
 5 Set Variable [ $_IDEmployeeActive; Employee::ID ]
 6 #  New window sizing and position
 7 Set Field [ Global::Message; "Please select a manager from the list." ]
 8 New Window [ Name: "Select Manager" ]
 9 Show/Hide Status Area [ Hide ]
10 # Loop through all employees and omit invalid selections
11 Go to Layout [ 'Select Manager' (Employee) ]
12 Show All Records
13 Go to Record/Request/Page [ First ]
14 Loop
15    If [ PatternCount ( ¶ & Employee::Lineage Multikey & ¶ ; ¶ & $_IDEmployeeActive & ¶ ) ]
16        Omit Record
17        Exit Loop If [ Get ( FoundCount ) = 0 ]
18    Else
19        Go to Record/Request/Page [ Next; Exit after last ]
20    End If
21 End Loop
22 Sort Records
    [ Specified Sort Order: Employee::Last First; ascending ]
    [ Restore; No dialog ]
23 Go to Record/Request/Page [ First ]
24 #  Initialize the selection vars
25 Set Variable [ $_IDEmployeeSelected; Value:"" ]
26 Set Variable [ $$_LastMessageChoice; Value:"Done" ]
27 #  Wait for user to click a button or press the enter key
28 Pause/Resume Script [ Indefinitely ]
29 If [ $$_LastMessageChoice = "Cancel" ]
30    #  The user cancelled
31    Close Window [ Current Window ]
32 Else If [ $$_LastMessageChoice = "Done" ]
33    # The user continued
34    Set Variable [ $_IDEmployeeSelected; Value:Employee::ID ]
35    Close Window [ Current Window ]
36    #  Set manager id to selected id
37    Set Field [ Employee::ID Manager; $_IDEmployeeSelected ]
38    #  Clean up
39    Commit Records/Requests
40    Refresh Window [ Flush cached join results ]
41 End If
The first three lines are typical of most scripts that involve user interaction (of course, whenever you set error capture on it is your responsibility to do all of your error handling manually). Next, we grab the Employee ID of the current record and store it in a local variable. The next chunk of steps (6 - 9) is just setting up the window, hiding the status area, etc...
Then comes the first interesting part - we need to filter out any invalid managers. So, we go to an employee layout and show all records in preparation for looping through them. If there were lots of employee records, we could pre-filter them based some user-defined criteria, like only names starting with the letter S, or something. For now, let's not worry about that.
Okay, the most important part of the script is this If block (lines 15 - 20):
If [ PatternCount ( ¶ & Employee::Lineage Multikey & ¶ ; ¶ & $_IDEmployeeActive & ¶ ) ]
    Omit Record
    Exit Loop If [ Get ( FoundCount ) = 0 ]
Else
    Go to Record/Request/Page [ Next; Exit after last ]
End If
As we are looping over the found set, we are checking to see if the id of the active employee record is in the Lineage Multikey of the current employee. If it is in Lineage Multikey, that means that the original employee is 'above' the current employee, so the current employee can't go 'above' the original. When the loop completes, the found set will represent valid manager choices for the original record.
Moving on in the script, we initialize two variables right before the pause:
$_IDEmployeeSelected which will contain the id of the employee that the user selects.
$$_LastMessageChoice will tell us what the user clicked on the layout. We set it to 'Done' as a default in case the user clicks nothing. Remember, they could press the enter key to resume the paused script and we want that to behave the same as clicking the Done button. It has to be global because it is being set by another script and local variables are only visible to the script in which they are defined.
(By the way, we realize that it would actually be slicker to use Get ( ScriptResult ) rather than a global variable for this Last Message Choice thing, but we think it is tougher to read. If you prefer that method, please have at it.)
While the script is paused, the user can't close the window because Allow User About is set to Off, so they have to either click a button or press the Enter key. Either way, $$_LastMessageChoice is going to equal either 'Cancel' or 'Done' when the script resumes.
First, we check for 'Cancel'. All we have to do in that case is to close the window and the script will complete.If the user did not cancel, then $$_LastMessageChoice will equal 'Done', so the Else If portion of the script will execute (lines 32 - 41). The first thing to do is grab the Employee ID of the record that the user is on in the pop-up window. We do this by setting $_IDEmployeeSelected. Then, we close the window, which will return us to the original employee record. Once back where we began, we can set the ID Manager field to the value stored in $$_LastMessageChoice.
Pop-Up Selection Routine: Select Reports
Since we can specify a manager for any given record, we could go through record by record assigning managers. In so doing, we would be populating the direct report portals as well. However, it might be nice to be able to add direct reports to the current record without having to navigate to another record, specify the previous record as the manager and then return to the previous record. You get the picture.
So, we are going to build a pop-up routine that will differ from the previous one in that multiple selections can be made. The first step is to create a few fields that will indicate which employees are selected in the pop-up window with a highlight:
A global text field to hold the selected Ids
A global container field to hold a swatch of highlight color
A field named 'Selected' in the Employee table that will equate to true if the record is selected
A field named 'Highlight' in the Employee table that will display the highlight color if Selected is true
Selected (Calculation, Number, Unstored, from Employee) =
PatternCount ( ¶ & Global::Selected IDs & ¶ ; ¶ & ID & ¶ ) > 0
Highlight (Calculation, Container, Unstored, from Employee) =
Case ( Selected ; Global::Highlight )
We could have combined the Selected and Highlight calculation fields into one, but you will see that having the Selected field broken out by itself can be useful in conditional statements. Also, if you ever need to alter the logic concerning what constitutes a selected record, you only have to change it in one place.
We should also note that we could have used a global variable to store the selected Ids, rather than creating the Selected Ids field. However, variable names tend to be a bit volatile. For instance, we might decide to rename the variable if its usage changes. Doing so would break this calculation (and any others that may depend on it). Since we are using a field to store the Ids, we can rename it and the calculation formula in the Selected field will update automatically. For this reason we shy away from using variables in field definitions, but is just a matter of taste.
The next step is some layout work. In the real world, we would modify the existing Select Manager layout to accommodate both situations, but that is beside the point right now and would only obscure the topic at hand. Plus, that concept is covered in detail in the Pop-Up Routines section. So, for now, just duplicate the Select Manager layout and rename it Select Reports.
Then, replace the invisible button in the body part with the Highlight field. Set the field to prevent entry, and set the graphics to expand to fill the entire area as shown in Figure 10.12. Also, to get your graphic to totally fill the field, you need to turn on the field borders, but set the border width to None.
Figure 10.12
Once you have the Highlight field in place, attach the BTN: Last Message Choice script to it. As before, you want the button to Resume the current script, but this time send a script parameter of 'Toggle Selection' instead of 'Done'. This will allow the user to make multiple selections.
Now on to the Select Reports script. As with the layout, we are going to duplicate the script and make changes to it for the sake of clarity here, but in practice we would alter the existing selection script to handle both situations.
Due to the more complex nature of selecting reports, we are going to break the single script into three separate ones:
1) BTN: Select Reports - This will be the script that is attached to the button on the Employee layout. It is the parent script and manages the other two subscripts.
2) ROUTINE: Select Reports - This script displays the pop-up window where the user makes their selections and passes the selected IDs back to the BTN: Select Reports script. It is important to emphasize that it does not actually do anything to process the selected record ids.
3) SUB: Assign Manager - This is the script that actually does something. The selected record IDs are passed to this script, which will then find those records and set their manager IDs to the ID of the original starting record.
Here are the script definitions:
Script definition for 'BTN: Select Reports'
1 Allow User Abort [ Off ]
2 Set Error Capture [ On ]
3 Freeze Window
4 Set Variable [ $_LineageIDs; Value:Employee::Lineage Multikey ]
5 Perform Script [ 'ROUTINE: Select Reports'; Parameter: $_LineageIDs ]
6 Set Variable [ $_Result; Value:Get ( ScriptResult ) ]
7 If [ $_Result � "Cancel" ]
8 Set Variable [ $_ManagerID; Value:Employee::ID ]
9 Perform Script [ 'SUB: Assign Manager'; Parameter: $_ManagerID & ¶ & Quote ( $_Result ) ]
10 End If
11 Commit Records/Requests
12 Refresh Window [ Flush cached join results ]
As mentioned above, this is the script that is attached to the button on the Employee layout. Therefore, it has the Employee Table Occurrence as an implied context. So, when we hit the first Set Variable step (line 4), we know it is safe to set the $_LineageIDs variable to the current Employee's Lineage Multikey field from the Employee Table without explicitly navigating to an Employee layout first.
Next, we call the pop-up routine (line 5), making sure to send the $_LineageIDs as a parameter. You will see how this parameter is used by the routine when we cover the next script.
Line 6 uses the Get ( ScriptResult ) function to store the result of the routine in a variable called $_Result. Since the user could have clicked 'Cancel' in the pop-up routine, we check for that value on line 7. If the user cancelled, the script will skip the processing steps (lines 8 and 9) and complete without doing much of anything.
If the user did not cancel, we can safely assume that there are record IDs stored in the $_Result variable, which will be processed by the subscript called on line 9. Notice that we are passing the id of the current record as the $_ManagerID parameter and the selected IDs as the $_Result parameter. How these parameters are used in the subscript will be covered shortly.
Maybe you noticed that we have wrapped $_Result in the Quote function. This is very important, so let's take a second to talk about it.
Imagine that you have two lists of values separated by carriage returns. Let's say the lists contain user data and therefore should be expected to contain all sorts of weird characters. Furthermore, you have no idea how long the lists are. You need to pass the two lists to a subscript for processing, so you need to delimit them with a character (or string of characters - yuck!) so the subscript will know where one stops and the next begins.
So, here comes the problem: What character do you use to delimit the data? Maybe the pipe character? You can't just assume that the data does not have a pipe in it. So you could escape for pipes, and then unescape in the subscript, but jeez, that's ugly.
Maybe you could use XML? Yikes, talk about overkill. Not to mention that there are no parsing capabilities built into FileMaker. Plus, as unlikely as it is, there could be XML in the user data that conflicts with your delimiter. We won't even suggest namespaces...
Well, what about a snazzy custom function! Sure, that would compartmentalize the mess, but you would have to rewrite the thing in every file you ever work in just to do something extremely common like pass multiple arrays around between scripts. And it is still a mess.
Fortunately - thanks to Kieren MacMillan (thanks Special-K!) - we have a solution that is clean, easy, and elegant. Whenever you are in a situation that calls for an array of arrays (like when you need to pass two or more arrays into a subscript) you just wrap each array with the quote function. Then, in the subscript, you unwrap each array with the Evaluate function. That's it.
It could not be simpler, it uses built in features of the application, and it allows us to program in the tried and true fashion of tons of other procedural scripting languages (think of php's urlencode / urldecode).
So, back to the situation at hand. It is likely that the contents of the $_Result variable are in a value list format. That is, a list of values separated by carriage returns (or a FileMaker 'array'). We want to pass this array and the Manager ID into the subscript as an array with two elements where one element is a number (the Manager ID) and the other is an array (the $_Results array). So, to make a long story longer, we quoted it. When we look at the subscript, you will see how we 'unquote' it.
Yes, there are about a thousand other ways this could be accomplished. However, we feel that using the Quote / Evaluate method is the most elegant and consistent with other programming languages.
Script definition for 'ROUTINE: Select Reports'
 1 Allow User Abort [ Off ]
 2 Set Error Capture [ On ]
 3 Freeze Window
 4 Set Variable [ $_LineageIDs; Get ( ScriptParameter ) ]
 5 Set Field [ Global::Message; "Please select direct reports by clicking." ]
 6 New Window [ Name: "Select Reports" ]
 7 Show/Hide Status Area [ Hide ]
 8 Go to Layout [ 'Select Reports' (Employee) ]
 9 Show All Records
10 Go to Record/Request/Page [ First ]
11 Loop
12    If [ PatternCount ( ¶ & $_LineageIDs & ¶ ; ¶ & Employee::ID & ¶ ) ]
13        Omit Record
14        Exit Loop If [ Get ( FoundCount ) = 0 ]
15    Else
16        Go to Record/Request/Page [ Next; Exit after last ]
17    End If
18 End Loop
19 Set Field [ Global::Selected IDs; "" ]
20 Sort Records [ Specified Sort Order: Employee::Last First; ascending ]
21 Go to Record/Request/Page [ First ]
22 Loop
23    Set Variable [ $$_LastMessageChoice; Value:"Toggle Selection" ]
24    Pause/Resume Script [ Indefinitely ]
25    If [ $$_LastMessageChoice = "Cancel" ]
26        Close Window [ Current Window ]
27        Exit Script [ Result: "Cancel" ]
28    Else If [ $$_LastMessageChoice = "Toggle Selection" ]
29        Set Field [ Global::Selected IDs;
30            If ( Employee::Selected ;
31                Substitute ( "¶¶¶" & Global::Selected IDs & "¶¶¶" ;
32                    [ ¶ & Employee::ID & ¶ ; ¶ ]
33                ;
34                    [ "¶¶¶" ; "" ]
35                )
36            ;
37                If ( IsEmpty ( Global::Selected IDs ) ;
38                    Employee::ID
39            ;
40                    Global::Selected IDs & ¶ & Employee::ID
41                )
42            ) ]
43        Refresh Window [ Flush cached join results ]
44    Else If [ $$_LastMessageChoice = "Done" ]
45        Set Variable [ $_SelectedIDs; Value:Global::Selected IDs ]
46        Close Window [ Current Window ]
47    Exit Script [ Result: $_SelectedIDs ]
48    End If
49 End Loop
This script is very similar to the select manager script. The main difference is that the user will be allowed to select one or more employees from the list, so the pop-up window will not close when an employee is clicked. Rather, their id will be added or removed from the Global::Selected Ids field and they will highlight when selected.
It is a little complicated, so let's step through it. The first line to consider is line 4 where we pull the script parameter into a variable named $_LineageIDs. On line 5, we are setting a global field to a message that will be displayed on the pop-up layout. We could have just typed the text directly on the layout, but this will give us more flexibility to repurpose the layout later on.
Lines 6 - 10 are used to open the new window and prepare to filter out the unacceptable options for the list of all records.
The loop that comes next (lines 11 - 18) iterates though the records and omits them if their id occurs in the list of Lineage IDs. Remember that the Lineage IDs are in the typical value list format, so we need to wrap the PatternCount parameters in return characters to be sure we don't get false positives (line 12).
Line 19 clears out the global field where we are going to temporarily store our selected ids. Then we sort the records by name, go to the first record and enter the event loop for this routine.
As with all routines, we set the $$_LastMessageChoice variable to the default value at the top of the loop and then pause. At this point, the user will be looking at a pop-up window that they can't dismiss (thanks to lines 1 and 2) without resuming the script. The only way to resume the script is to click a button on the layout, or by pressing the return key (Well, there are a couple of other ways, but that will be covered in the Pop-Up Routine chapter).
Given the parameters in the buttons on the Select Reports layout, there are only three possible values for the $$_LastMessageChoice variable: Cancel, Toggle Selection, or Done.
The Cancel option is really simple and is handled first (lines 25-27). Not much to talk about - just close the pop-up window and exit the script with a 'Cancel' result. The calling script will be checking for 'Cancel' as a possible outcome, so it is important not to forget this.
The next option is Toggle Selection (lines 28-43) which is triggered by clicking on a record. The concept is simple: if the record is not already selected, then select it. If not, deselect it. Since there is no Exit script step inside this If block, the loop that we are inside will iterate and we will end up back at the pause, waiting for more user interaction.
The only mildly complicated part of the Toggle Selection block is the calculation inside the Set Field step on line 29. To make it easier to discuss, I broke out the calculation with line numbers (lines 30-42), although they are all really inside of the Set Field step (line 29).
If the current record is selected, then the initial If (line 30) will evaluate to TRUE and the Substitute function (lines 31 - 35) will be triggered to remove the current id from the list of selected IDs. Sorry about all the return characters, but we are trying to maintain a value list format for the selected IDs so that they are easy to manipulate later using the value functions. This could be done a lot clearer with a custom function, but it is not really too bad once you get the idea of it.
If the clicked record was not already selected, we will hit the second If statement (line 37) where we are checking to see if anything at all has been selected yet. If not, we just stick the ID of the clicked record in there. Otherwise, we append a return character and then the ID. Again, we are bending over backwards to keep that value list format since it is the closest thing we have to an array in FileMaker.
On line 43 we refresh the window to make sure the highlight toggles correctly. As we said, there is no exit in this block, so the user will remain in the loop and end up back at the Pause step (line 24).
Last but certainly not least, we have the 'Done' block (lines 44 - 48). This one is just about as easy as the Cancel block. Set the $_SelectedIDs variable to the selected IDs in the global field, close the window, and Exit the script with $_SelectedIDs as the script result.
Notice that this script has done absolutely nothing to the state of the database. We have merely captured some user input in memory and passed it back to the calling script.
It might be a good idea to take a second look the script definition for 'BTN: Select Reports', starting at line 5 to see how the machinations of this script will be received by the calling script.
Script definition for 'SUB: Assign Manager'
 1 Allow User Abort [ Off ]
 2 Set Error Capture [ On ]
 3 Set Variable [ $_ManagerID; Value:GetValue ( Get ( ScriptParameter ) ; 1 ) ]
 4 Set Variable [ $_ReportIDs; Value:Evaluate ( GetValue ( Get ( ScriptParameter ) ; 2 ) ) ]
 5 New Window [ Name: "TEMP"; Left: 3000 ]
 6 Go to Layout [ 'Utility: Employee' (Employee) ]
 7 Enter Find Mode [ ]
 8 Set Field [ Employee::ID Manager; $_ManagerID ]
 9 Perform Find [ ]
10 If [ Get ( FoundCount ) ]
11     Replace Field Contents [ Employee::ID Manager; Replace with calculation: "" ]
12 End If
13 Set Variable [ $_Counter; Value:1 ]
14 Loop
15     Exit Loop If [ $_Counter > ValueCount ( $_ReportIDs ) ]
16     Set Variable [ $_CurrentReportID; Value:GetValue ( $_ReportIDs ; $_Counter ) ]
17     Enter Find Mode [ ]
18     Set Field [ Employee::ID; $_CurrentReportID ]
19     Perform Find [ ]
20     Set Field [ Employee::ID Manager; $_ManagerID ]
21     Commit Records/Requests
22     Set Variable [ $_Counter; Value:$_Counter + 1 ]
23 End Loop
24 Close Window [ Current Window ]
This script will be called by the 'BTN: Select Reports' assuming that the user did not cancel in the pop-up selection window. It will receive a parameter containing two values separated by a carriage return: the Manager ID and an array of Direct Report IDs.
Since the Direct Report IDs are an array unto themselves, they we quoted on the way into this script, so we need to 'unquote' them here. To do so, we employ the Evaluate function (line 4). This will turn the single line string back into a list so we can interact with it using the GetValue function later in the script.
Next, we need to locate the previous direct reports to clear out their manager id (lines 5 - 12). This is done in a new window to leave the current found set undisturbed.
The remaining steps (lines 13 - 24) loop through the list of selected ids, finding each one at a time and setting their Manager ID to the value that was sent into this script as a parameter.
First, we initialize a counter variable and enter the loop. Or exit criteria is checked immediately (line 15) because the list of direct report ids could be empty.
Assuming it is not empty, we use the GetValue function to pull the current id out of the list (line 16) and into the $CurrentReportID variable. Then, we find the record and set its ID Manager field to the value in $_ManagerID.
Wash, rinse, repeat. When the loop exits, the window closes and control returns to the calling script.
Okay, we can hear you now - 'Why are you looping through and finding each record one at a time? That is not exactly the most efficient method. You could have created multiple find requests and just executed it once. You could have set a global field to the list and done a Go to Related Record script step.' Etc, etc, etc...
The fact of the matter is, this script is full of serious holes. Most notably, we have error capture on and are not doing any error handling at all. This is very bad, particularly because we are potentially editing lots and lots of records, not just once, but twice (the replace and the looping set field). In a multi-user situation, this would be a disaster waiting to happen.
If any one of the records was locked by another user, or by the current user in another window, or if the current user did not have permission to edit the records, the script would silently and miserably fail. But not without editing some of the records. Ouch.
There are two things we would like to you think about here:
- Error handling: If you turn error capture on, you need to trap for errors like crazy. Even a New Record script step can fail if a user does not have the correct permissions. For the purpose of this book, it is unrealistic to muck up the scripts with exhaustive error handling. It would just obscure whatever point we are trying to illustrate.
- Modular scripting: Now you know that you need to beef up the error handling (and performance) of this script. The beauty of having a script that just does one thing is that you can go nuts improving it. All you have to do is make sure that it continues to expect the same sort of input and continues to return the same sort of output. As long as you do that, you don't need to know what other scripts call it - they will just work.
Many-to-Many Recursion: Product Catalog
Many-to-many recursion tends to crop up when dealing with Products, Inventory, Assemblies, Components, Items, etc... In many cases, objects like these can be part of more than one other object, which is to say that these objects can have zero, one or more than one parent.
In relational design, many-to-many relationships are resolved with what is commonly referred to as a 'Join' table. Recursive many-to-many relationships are no different. This would be represented in an ERD as seen in Figure 10.13.
Figure 10.13 Many-to-Many ERD
In this case, we have a Product table that has a many-to-many relationship with itself. The Assembly table is used to resolve this relationship.
The Assembly table has two fields that both hold IDs from the product table: ID Child and ID Parent. By looking at the first two Assembly records in Figure 10.14, you can see that the Gould Water Pump contains two other products: the 4' clear silicone gasket, and the #9 Phillips head screw. Furthermore, the 'Child Quantity Required' field indicates that the pump requires 1 of the gaskets and 2 of the screws.
Figure 10.14
What we are going to do to illustrate how to work with a typical recursive many-to-many is build a file with the following features:
- A table that tracks Products (name: Product)
- A table that tracks which Products are components of other Products (name: Assembly)
- A routine for creating Assembly records
- A table that tracks when purchased Products are received (name: Receiving)
- A routine for creating Receiving records
- Tables to track when Products are sold (names: Invoice and Invoice Item)
- A routine for creating Invoice and Invoice Item records
- A table that tracks when Products are assembled from other products (name: Production)
- A routine for creating Production records
- A field to calculate the quantity of products bought
- A field to calculate the quantity of products sold
- A field to calculate the quantity of products made
- A field to calculate the quantity of products used
- A field to calculate the quantity of products on hand
Let's begin by creating the Product and Assembly tables, and relating them together in the graph. In the Product table, create the fields as shown in Figure 10.15. Notice that the Selected field requires a field named Global::Selected IDs Product which is a global text field that lives in the Global table. All we really need in the Assembly table are the fields shown in Figure 10.14: ID Parent, ID Child, and Child Quantity Required.

Figure 10.15
Now, set up the graph like Figure 10.16 and you will be ready to start working on the layout.
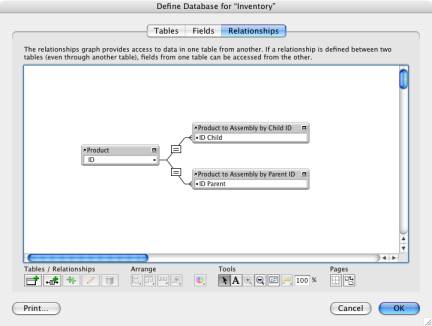
Figure 10.16
Create a new layout based on the Product table occurrence and add two portals to the bottom of it. The first one will be called 'Parent Products' and will be based on the 'Products to Assembly by Child ID'. The second portal will be called 'Child Products' and will be based on the 'Products to Assembly by Parent ID'.
Don't get confused by the parent/child reversal. In English, we would say 'In the parent products portal, we want to see all the assembly records where the child id equals the id of the current Product record.' While you are at it, add a delete portal row button to both portals and a button above each portal that we will use to create new portal records. We will write the scripts for these buttons in the next step. The result should look something like Figure 10.17.
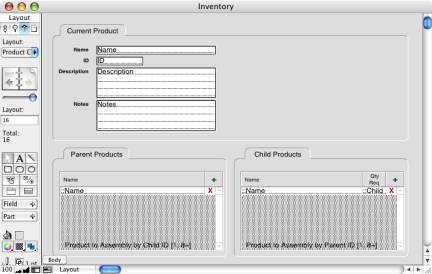
Figure 10.17
New Assembly Script
The scripts that create new records in the Assembly table are not long or complicated, but they do get a bit confusing. Basically, we are going to write the feature for the following process flow:
1) User clicks the 'New' button above one of the portals
2) User is presented with a list of valid Products to select from
3) User selects one or more products to associate with the active record
4) User clicks Done
5) Records are created in the Assembly table associating the active record to the selected records
The tricky part is the second step - presenting the user with valid selections from which to choose. As with the One-to-Many example in the first half of this chapter, we don't want to allow a product to be a part of itself or any of its descendant parts. Vice versa - we don't want a product to contain itself, its container, or any of its parent's containers.
We will handle this feature with four scripts:
BTN: New Assembly - This is the script that is attached to the button on the layout.
ROUTINE: New Assembly - This script will handle most of the heavy lifting, other than duties handed off to the following two scripts.
ROUTINE: Select Product - This is a fairly generic selection routine that takes a list of Product ID to omit as a parameter and returns a list of selected Product IDs.
SUB: Find Ancestors - This script will recursively compile a list of ancestor IDs for the current product. You may recall that this function was handled with the Lineage Multikey field in the previous section, but that is not an option in the case of Many-to-Many recusive relationships because any given product could have multiple parents.
We are going to cover these scripts out of order. Let's start with 'BTN: New Assembly'
Script definition for 'BTN: New Assembly'
Allow User Abort [ Off ]
Set Error Capture [ On ]
Freeze Window
If [ Get ( WindowMode ) = 0 ]
    Show Custom Dialog [ Title: "Alert"; Message: "Please return to browse and click again."; Buttons: 'OK' ]
    Exit Script [ ]
End If
Perform Script [ 'ROUTINE: New Assembly'; Parameter: Get ( ScriptParameter ) ]
Refresh Window [ Flush cached join results ]
As you can see, this script does a bit of error checking and then hands off the script parameter to a sub-routine. The expected parameters are the id of the current record and a direction that will indicate which portal was clicked - either 'Parent' or 'Child'.
Next, we need to look at the 'SUB: Find Ancestors' script which will be used to compile a list of ancestor ids for the current record. This list of IDs will later be sent to the 'ROUTINE: Select Product' so it will know which records to omit as invalid selections.
Script definition for 'SUB: Find Ancestors'
 1 Go to Record/Request/Page [ First ]
 2 Loop
 3     If [ IsValid ( Product to Assembly by Child ID::ID ) ]
 4         Go to Related Record [ From table: 'Product to Assembly by Child ID to Product'][ Show only related records; New window ]
 5         Perform Script [ 'SUB: Find Ancestors' ]
 6         Set Variable [ $_Multikey; Value:If ( $_Multikey = ""; Get ( ScriptResult ) ; $_Multikey & ¶ & Get ( ScriptResult ) ) ]
 7     End If
 8     Set Variable [ $_Multikey; Value:If ( $_Multikey = "" ; Product::ID ; $_Multikey & ¶ & Product::ID ) ]
 9     Go to Record/Request/Page [ Next; Exit after last ]
10 End Loop
11 Close Window [ Current Window ]
12 Exit Script [ Result: $_Multikey ]
Thankfully, this script is pretty short, but unfortunately it is not simple. Check out the Perform Script on line 5: This script is calling itself! Recursion in all its glory. Let's take it from the top...
This script will be called from a found set of 1 - the active record. So, starting from there, line 1 (Go to Record/Request) is sort of redundant. Then we enter a loop and immediately hit a conditional. The If statement is checking to see if the current record has any parents.
If it does have parents, the Go to Related Record step is called, which will open a new window with a found set of the immediate parents of the current record. Then, this very script is called again, which will act on that new window, so we are taken back to the top at line 1 (Go to Record/Request). But now, we are on a new first record, in a new found set, in a new window. The original window is still open and the original script is sitting there waiting for this new script to finish.
Let's say the new window only has a found set of one record, because the original record only had one parent. And let's also say that the one record in the new window has no parents. That being the case, as the new script progresses, the If block will be skipped this time because this new record has no parents. The next step merely appends the current record ID to a local variable called $_Multikey. This is the first and only record in this found set, so $_Multikey will only contain one ID at this point.
Then, this new script will progress to the Go to Next Record and it will exit the loop because we only have one record in the found set. The window will then be closed and the single ID stored in $_Multikey will be returned to the calling script, which is still sitting there on line 5 waiting for it to finish.
At this point, line 5 of the original script finally finishes, and we move to line 6, where we set $_Multikey to itself and the result of the script that just ran.
Remember, we are using local variables here, so the value of $_Multikey is unique to each iteration of the script call. So, if we didn't pass the values back, they would just disappear when the subscript ended. Using a local variable is preferable to using a global variable because global variables last until the file is closed. Therefore, the second time we ran this script, we would have to worry about clearing out the previous values.
Anyway, back to the progress of the original script. We just grabbed the ids from the subscript and then the If block closes. Next, we tack the ID of the current record onto $_Multikey before going to the next record (line 8).
Since we are back to the original record, with a found set of one in the original window, we will exit the loop when we hit the Go to Next Record step. The window will close, and we will return the return delimited list of compiled ids to the calling script. They will eventually be used as an input parameter to the Select Product routine, so it knows which Products to omit.
ROUTINE: Select Product
Selection routines are very useful and you will find that you need to write them often. In fact, we have already seen two in this very chapter! That being the case some of this may seem redundant, but that is okay. One of the main points we want to get across is code reuse, and nothing inspires code reuse more than a little painful repetition. So, here we go.
The first part of creating a selection routine is creating the selection layout. This selection layout will have a Cancel button, a Done button, and an invisible button covering the body part that will toggle the clicked record.
As always with selection routines (and routines in general), all the buttons will be set to resume the current script, and each button will send a different parameter to the BTN: Last Message Choice script. In this case, Cancel will equal 'Cancel', Done will equal 'Done' and toggling a record selection will equal 'Toggle Selection'. Since this routine will allow for multiple selections, the parameter sent by the Toggle record button has to be different from the Done button. (Sound familiar yet?)
In addition to the buttons, we have added a merge field to the header part that will allow us to send context specific messaging to the user. Of course, we have also added a merge field that will display the product name, and a Highlight field to indicate the currently selected records.
The completed layout should look something like Figure 10.18.
Figure 10.18
With the layout created, we are ready to make the selection script.
Script definition for 'ROUTINE: Select Product'
 1 Allow User Abort [ Off ]
 2 Set Error Capture [ On ]
 3 Freeze Window
 4 Set Variable [ $_Multikey; Value:Get ( ScriptParameter ) ]
 5 Set Field [ Global::Message; "Please select one or more products." ]
 6 Set Field [ Global::Selected IDs Product; "" ]
 7 New Window [ Name: "Select Products"]
 8 Show/Hide Status Area [ Hide ]
 9 Go to Layout [ 'Select Product' (Product) ]
10 Show All Records
11 If [ not IsEmpty ( $_Multikey ) ]
12     Go to Record/Request/Page [ First ]
13     Loop
14         If [ PatternCount ( ¶ & $_Multikey & ¶ ; ¶ & Product::ID & ¶ ) ]
15             Omit Record
16             Exit Loop If [ Get ( FoundCount ) = 0 ]
17         Else
18             Go to Record/Request/Page [ Next; Exit after last ]
19         End If
20     End Loop
21 End If
22 Sort Records [ Specified Sort Order: Product::Name; ascending ]
23 Go to Record/Request/Page [ First ]
24 Loop
25     Set Variable [ $$_LastMessageChoice; Value:"Toggle Selection" ]
26     Pause/Resume Script [ Indefinitely ]
27     If [ $$_LastMessageChoice = "Cancel" ]
28         Close Window [ Current Window ]
29         Exit Script [ Result: "Cancel" ]
30     Else If [ $$_LastMessageChoice = "Toggle Selection" ]
31         Set Field [ Global::Selected IDs Product;
32             If ( Product::Selected ;
                   Substitute ( "¶¶¶" & Global::Selected IDs Product & "¶¶¶";[ ¶ & Product::ID & ¶ ; ¶ ];[ "¶¶¶" ; "" ] )
               ;
                   If ( IsEmpty ( Global::Selected IDs Product ) ;
                       Product::ID
                   ;
                       Global::Selected IDs Product & ¶ & Product::ID
                   )
               ) ]
33         Refresh Window [ Flush cached join results ]
34     Else If [ $$_LastMessageChoice = "Done" ]
35         If [ IsEmpty ( Global::Selected IDs Product ) ]
36             Show Custom Dialog [
                   Title: "Message";
                   Message: "Please select a product before continuing.";
                   Buttons: 'OK' ]
37         Else
38             Set Variable [ $_Multikey; Value:Global::Selected IDs Product ]
39             Close Window [ Current Window ]
40             Exit Script [ Result: $_Multikey ]
41         End If
42     End If
43 End Loop
This is a garden-variety selection routine, and with the exception some minor naming differences, is almost identical to the 'ROUTINE: Select Reports' script in the previous section. One difference worth noting is that in the 'Done' section, there is some error checking to make sure the user has selected at least one Product (lines 35 and 36). If they have not, they are prompted and returned to the Pause script step at the top of the event loop. If they want to leave the routine without making a selection, they need to click the Cancel button.
At this point, we have covered enough ground to take a look at the New Assembly routine that will drive these subscripts.
Script definition for 'ROUTINE: New Assembly'
 1 Allow User Abort [ Off ]
 2 Set Error Capture [ On ]
 3 Freeze Window
 4 Set Variable [ $_ID; Value:GetValue( Get ( ScriptParameter ) ; 1 ) ]
 5 Set Variable [ $_Direction; Value:GetValue( Get ( ScriptParameter ) ; 2 ) ]
 6 New Window [ Name: "TEMP" ]
 7 Go to Layout [ 'Utility: Product' (Product) ]
 8 Enter Find Mode [  ]
 9 Set Field [ Product::ID; $_ID ]
10 Perform Find [  ]
11 If [ $_Direction = "Child" ]
12         Perform Script [ 'SUB: Find Ancestors' ]
13 Else
14         Perform Script [ 'SUB: Find Descendants' ]
15 End If
16 Set Variable [ $_Multikey; Value:Get ( ScriptResult ) ]
17 Perform Script [ 'ROUTINE: Select Product'; Parameter: $_Multikey ]
18 Set Variable [ $_Multikey; Value:Get ( ScriptResult ) ]
19 If [ $_Multikey = "Cancel" ]
20        Exit Script [ Result: "Cancel" ]
21 End If
22 New Window [ Name: "TEMP" ]
23 Go to Layout [ 'Utility: Assembly' (Assembly) ]
24 Set Variable [ $_Counter; Value:1 ]
25 Loop
26     Exit Loop If [ $_Counter > ValueCount ( $_Multikey ) ]
27     New Record/Request
28     Set Field [ Assembly::ID Child;
               If ( $_Direction = "Child" ;
                   GetValue ( $_Multikey ; $_Counter )
               ;
                   $_ID
               ) ]
29     Set Field [ Assembly::ID Parent;
               If ( $_Direction = "Parent" ;
                   GetValue ( $_Multikey ; $_Counter )
               ;
                   $_ID
               ) ]
30     Commit Records/Requests [ ]
31     Set Variable [ $_Counter; Value:$_Counter + 1 ]
32 End Loop
33 Close Window [ Current Window ]
Ah, fairly simple. Since all of the complex activity is taking place in reusable subscripts, this script is pretty basic. In the first section (lines 1 - 3), we include the standard Allow User Abort, etc... steps. Then we grab the two expected values from the script parameter: the ID of the current record and the direction of the action (in this case 'Child').
We need to isolate the current record in a new window so we don't mess up the users current found set, which we do in lines 6 -10. Notice that we did not use the oft seen, but not multi-user friendly 'Show All, Omit Record, Show Omitted'.
Lines 11 - 15 call the appropriate subscript and return the resulting list of Ids the the $_Multikey variable in line 16. For the sake of brevity, we did not cover 'SUB: Find Descendants' because it is just like 'SUB: Find Ancestors' with the exception of the relationship used in the Go To Releated Records step. In reality, we would have just used one script and sent the direction parameter into it.
Then, we feed the ancestor ids into the 'ROUTINE: Select Product' subscript, thereby omitting invalid options from the selection pop-up (line 17). Assuming the user does not cancel while selecting products, the $_Multikey variable will wind up holding a list of selected Product IDs.
Finally, we reach the whole point of the script, which is creating Assembly records. We open a temp window, go to an Assembly layout and begin looping through the selected ids creating records as we go (lines 22 - 32).
Notice that in the Set Field calculations on lines 28 and 29 we are using the $_Direction script parameter to determine which ID is the parent and which is the child.
Once all the records are created, we just close the temp window. Control will return to the button script, which just finishes up with a refresh for good measure
For the purpose of discussion, we are going to refer to products that are made up of other products as 'Assemblies', and products that are part of other objects as 'Components'. Of course, when a Component is made up of other Components, it would be correct to refer to it as both an Assembly and a Component, but we won't let that worry us for now.
So far, we have created a data structure that describes the assembly of products, but that is all theoretical information. Think of it as a catalog of products, but not a representation of items on shelves. In other words, we may know that we need twelve #9 Phillips head screws and a 4' clear silicone gasket to make a Stihl 6 gallon tank, but we still have no idea how many of them are sitting in the warehouse. That would be Inventory and is what we will start working on now.
Receiving
The most obvious place to start is Receiving. Basically, this amounts to creating a structure to track and manage data about products that we have bought.
Imagine a guy on a loading dock checking in a box and then scanning it into inventory, indicating that it has been received. Doing so would increment the quantity of the scanned product in inventory.
First we need a table - let's call it Receiving. See Figure 10.19 for a list of fields. Date Created and ID are pretty self-explanatory. ID Product will link to the related record in the Product table and Quantity will hold the number of Products received.
Figure 10.19
Once you have the table created, head over to the graph and create a new table occurrence called 'Product to Receiving' which will be based on the Receiving table. Then, connect the ID field in the 'Product' table occurrence to the ID Product field in the 'Product to Receiving' table occurrence.
Now you can go to the field list for the Product table and create a number calculation field called Quantity Received with the following definition:
Quantity Received =
Sum ( Product to Receiving::Quantity )
We are done in Define Database for now, so close out of there and let's make a layout in preparation for one of our upcoming scripts. It will be called 'Inventory Adjustment' and will be based on the global table. It should look something like figure 10.26
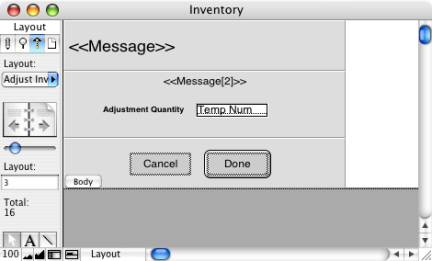
Figure 10.26
It is a very simple layout that has a couple merge fields for dynamic layout messaging, a single input field which is a global number field that lives in the global table, and two buttons: Cancel and Done. Each button is set to Resume the current script and both call the BTN: Last Message Choice script with a parameter that corresponds to their label.
Now we are ready to jump into ScriptMaker to build out the following two scripts: BTN: Product Receive and ROUTINE: Inventory Adjustment. The first is a simple little button script that basically sends a script parameter to the second script and creates a record if the second script exits successfully.
BTN: Product Receive
Allow User Abort [ Off ]
Set Error Capture [ On ]
Freeze Window
Perform Script [ 'ROUTINE: Inventory Adjustment'; Parameter: "Receive" ]
Set Variable [ $_Quantity; Value:Get ( ScriptResult ) ]
If [ $_Quantity <> "Cancel" ]
    Set Variable [ $_IDProduct; Value:Product::ID ]
    Go to Layout [ 'Utility: Receiving' (Receiving) ]
    New Record/Request
    Set Field [ Receiving::ID Product; $_IDProduct ]
    Set Field [ Receiving::Quantity; $_Quantity ]
    Commit Records/Requests
    Go to Layout [ original layout ]
End If
Refresh Window [ Flush cached join results ]
Next is the main routine that we are going to be using for all of our inventory adjustment needs. It will behave appropriately to whatever script parameter we send it. In this case, we will be sending it the value 'Receive'.
ROUTINE: Inventory Adjustment
 1 Allow User Abort [ Off ]
 2 Set Error Capture [ On ]
 3 Freeze Window
 4 Set Variable [ $_Type; Value:Get ( ScriptParameter ) ]
 5 Set Variable [ $_ProductName; Value:Product::Name ]
 6 Set Field [ Global::Message;Get ( ScriptParameter ) & " " & $_ProductName ]
 7 Set Field [ Global::Message[2];"Please specify a quantity." ]
 8 New Window [ Name: "Inventory Adjustment" ]
 9 Show/Hide Status Area [ Lock; Hide ]
10 Go to Layout [ 'Adjust Inventory' (Global) ]
11 Adjust Window [ Resize to Fit ]
12 Loop
13     Set Variable [ $$_LastMessageChoice; Value:Done ]
14     Go to Field [ Global::Temp Num ] [ Select/perform ]
15     Pause/Resume Script [ Indefinitely ]
16     If [ $$_LastMessageChoice = "Cancel" ]
17         Close Window [ Current Window ]
18         Exit Script [ Result: "Cancel" ]
19     Else If [ $$_LastMessageChoice = "Done" ]
20         If [ IsEmpty ( Global::Temp Num ) ]
21             Show Custom Dialog [ Title: "Alert"; Message: "Please enter a quantity."; Buttons: 'OK' ]
22         Else
23             Set Variable [ $_Result; Value:Global::Temp Num ]
24             Close Window [ Current Window ]
25             Exit Script [ Result: $_Result ]
26         End If
27     End If
28 End Loop
We are guessing that this script is starting to look pretty familiar and does not bear much description.
With these scripts in place, head back to the Product layout and add Quantity Received to the layout. Create a button called 'Receive...' and put it next to the Quantity Received field. Attach the 'BTN: Product Receive' script to the new button.
When the 'Receive...' button is clicked, the user will be presented with a pop-up dialog that allows them to enter a quantity received for the current Product. When the user clicks 'Done' in the pop-up (or presses the Enter key), the script will resume and create a record in the Received table with the appropriate foreign key from the Product table and the specified quantity. As more and more Receiving records are created for a given product, the Quantity Received number in the Product record will increment.
We should point out that if the product received is an assembly, meaning that it is made up of other products, the Quantity Received for the component products does not change.
To put it another way, imagine that you usually make your own pumps by assembling twelve screws and a gasket, but you are out of gaskets. So, you purchase a completed pump from a supplier and it is delivered to you. You 'receive' it with your new button and the pump goes into inventory. However, the twelve screws and the gasket that are parts of the pump you just bought DO NOT go into inventory, even though they are physically sitting there, inside the pump.
That is because they make up the pump and therefore cannot also be in inventory. They are being used and are not available for making another pump, for instance. This may be self-evident in this case, but when we get to the section on production it will get a little murkier.
Invoicing
Our next stop in the description of our inventory system is Invoicing. Basically, this amounts to creating a structure to track and manage data about products that we have sold.
Imagine a salesperson closing a deal, and creating an invoice for a customer. At that point, it would be sensible to decrement the sold quantity of products from inventory.
Traditionally, Invoices are stored in two tables, so we will do it that way. The tables will be named Invoice and Invoice Item. Normally you would also expect some kind of customer table that would be a parent of Invoice, but that is not relevant to our discussion of Many-to-Many recursion so we are going to leave it out. See Figures 10.20 and 10.21 for a list of fields.
The Invoice table is nothing more than an ID and a Date Created field. Invoice Item also has ID and Date Created, but also has ID Invoice and ID Product, which are foreign keys from their respective tables. Quantity is the number of Products sold. Quantity is the number that will be decremented from the inventory of the Product specified in ID Product.

Figure 10.20
Figure 10.21
With the Invoice and Invoice Item tables created, jump over to the graph. Attach the Invoice, Invoice Item, and Product table occurrences to each other so that the relationships in Figure 10.27 exist (other relationships will exist as well).
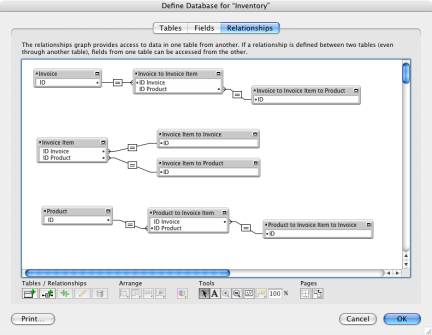
Figure 10.27
Next, go to the Product table and create a number calculation field called Quantity Invoiced with the following definition:
Quantity Invoiced =
Sum ( Product to Invoice Item::Quantity )
We are done in Define Database for now, so close out of there and jump into ScriptMaker and create a script called BTN: Product Invoice that will be very similar to the BTN: Product Receive script that we built previously.
BTN: Product Invoice
Allow User Abort [ Off ]
Set Error Capture [ On ]
Freeze Window
Perform Script [ 'ROUTINE: Inventory Adjustment'; Parameter: "Invoice" ]
Set Variable [ $_Quantity; Value:Get ( ScriptResult ) ]
If [ $_Quantity <> "Cancel" ]
    Set Variable [ $_IDProduct; Value:Product::ID ]
    Go to Layout [ 'Utility: Invoice' (Invoice) ]
    New Record/Request
    Set Variable [ $_IDInvoice; Value:Invoice::ID ]
    Go to Layout [ 'Utility: Invoice Item' (Invoice Item) ]
    New Record/Request
    Set Field [ Invoice Item::ID Invoice; $_IDInvoice ]
    Set Field [ Invoice Item::ID Product; $_IDProduct ]
    Set Field [ Invoice Item::Quantity; $_Quantity ]
    Commit Records/Requests
    Go to Layout [ original layout ]
End If
Refresh Window [ Flush cached join results ]
As you can see, this script is exactly like BTN: Product Receive except that it sends a different script parameter to the subscript, and assuming the subscript exits successfully, it creates two records - one in Invoice and one in Invoice Item.
If we were going to really implement this solution, we would insert a Select Customer routine right before the Inventory Adjustment routine. Doing so would allow the user to select the parent customer related to the invoice prior to creating the invoice record. As we noted above, adding this would not really illustrate our point any better, so we will leave it to you to do as extra credit.
Production
As you will soon see, we have saved the best for last. The production portion of the system will allow the user to track and manage data about products that have been built.
Sticking with our pump example from the previous section, imagine that there are twelve screws and a gasket sitting on a warehouse shelf. Now, picture someone taking those products and assembling them to create a pump. Then, they put the pump on the shelf. Technically, the screws and the gasket are still on the shelf, by virtue of the fact that they are inside the pump. However, they are spoken for, in the sense that they are in use.
So, the only reasonable thing to do with respect to inventory is to decrement the inventory numbers for the screws and gaskets, and to increment the inventory number for the pump.
Whenever a production record is created, some inventory numbers will go down and some will go up. In our example, you would say, 'The screws and gasket were consumed when the pump was produced.'
To build it, we first create a table called Production. The fields will be very similar to the fields in the previous examples. See Figure 10.22 for details. Date Created and ID are pretty self-explanatory. ID Product will link to the related record in the Product table and Quantity will hold the number of Products produced.
Figure 10.22
Once you have the table created, all you need to do in the graph is create a table occurrence called 'Product to Production' (based on the Production table) and connect its ID Product field to the ID field in the Product table occurrence.
Next, go to the Product table and create a number calculation field called Quantity Produced with the following definition:
Quantity Produced =
Sum ( Product to Production::Quantity )
That's it in Define Database for now, so now it is time to create the BTN: Product Make script.
BTN: Product Make
Allow User Abort [ Off ]
Set Error Capture [ On ]
Freeze Window
Perform Script [ 'ROUTINE: Inventory Adjustment'; Parameter: "Make" ]
Set Variable [ $_Quantity; Value:Get ( ScriptResult ) ]
If [ $_Quantity <> "Cancel" ]
    Set Variable [ $_IDProduct; Value:Product::ID ]
    Go to Layout [ 'Utility: Production' (Production) ]
    New Record/Request
    Set Field [ Production::ID Product; $_IDProduct ]
    Set Field [ Production::Quantity; $_Quantity ]
    Commit Records/Requests
    Go to Layout [ original layout ]
End If
Refresh Window [ Flush cached join results ]
If you refer back to the BTN: Product Receive, you will see that this script is almost identical.
So, what about those Inventory numbers?
At this point, we have all the scripts we need to manage our inventory. Now it is time to start calculating some inventory numbers.
Our main goal is to create a field called Quantity On Hand, which will consist of the quantity received, plus the quantity produced, minus the quantity invoiced, minus the quantity consumed during production. It will look like this:
Quantity On Hand =
Quantity Received
+ Quantity Produced
- Quantity Invoiced
- Quantity Consumed
Jump into Define Database and get ready to make some inventory fields in the Product table. They will all be calculation fields that resolve as number data types. Three of them are easy:
Quantity Received =
Sum ( Product to Receiving::Quantity )Quantity Invoiced =
Sum ( Product to Invoicing::Quantity )
Quantity Produced =
Sum ( Product to Production::Quantity )
Now, all we need to create the Quantity On Hand field is the Quantity Consumed field. However, the Quantity Consumed field is a tricky little bugger, so let's talk in terms of our example products.
According to the data in the Product and the Assembly tables, a pump consists of 12 screws and 1 gasket. Therefore, if 10 pumps are produced, 120 screws and 10 gaskets are consumed.
So, to determine consumption numbers we must multiply the produced quantity of the parent item by the number of children contained in the parent. To put it another way:
Parent Product Quantity Produced * Child Product Quantity Required
Hmmm... 'Parent', 'Child' - those sound familiar. Don't we have fields with names like these in the Assembly table? Why yes, we do, and that is where this calculation needs to go.
From any given Assembly record, we can look to the Product table across the Parent ID relationship and grab the value from the Quantity Produced field. We will then multiply that number by the Quantity Child Required field in the Assembly table. The result is the number of children consumed by the production of parents.
The calculation field in the Assembly table looks simpler than it sounds:
Quantity Child Consumed =
Assembly to Product by Parent ID::Quantity Produced * Child Quantity Required
Once you have the Quantity Child Consumed field created in Assembly, you are almost done. The next step is to go to the Product table and create the Quantity Consumed field.
Speaking in terms of actual products again, imagine that you are in Browse Mode on the Product layout, on the screw record. Now, picture a portal based on an Assembly table occurrence that relates to the Product table using this relationship:
Product::ID=Assembly::Child ID
In that portal, you would expect to see all of the Assemblies that contained the screw in question. In other words, the 'Parents' of the screw.
Now, if you added the Quantity Child Consumed field to that portal, it would list the numbers of screws consumed in each of the parents. Eureka! If we total the Quantity Child Consumed column, we will have the total number of screws consumed by the various parents. That's not so bad after all. Here is the calculation in the Product table:
Quantity Consumed =
Sum ( Product to Assembly by Child ID::Child Quantity Consumed )
That does it - we have all the building blocks we need to create the Quantity On Hand field. Here it is again:
Quantity On Hand =
Quantity Received
+ Quantity Produced
- Quantity Invoiced
- Quantity Consumed
But what about the layout?
It's all well and good that we have created our fancy fields, but we need to mush around in Layout Mode to make it useful. Switch into Layout Mode on the Product layout and add the Quantity Received, Quantity Invoiced, Quantity Produced, Quantity Consumed, and Quantity On Hand fields from the Product table.
Then, create three buttons named Receive, Invoice, and Make. Attach the corresponding scripts - BTN: Product Receive, BTN: Product Invoice, and BTN: Product Make. Place them on the layout next to their related fields. The result should look like Figure 10.23.

Figure 10.23
Voila! You now have a fairly sophisticated inventory solution (well, the start of one, at least...). We can envision some modifications you would need to make to deal with the real world. For instance, what if someone disassembles a pump because they need the screws to build a generator? What about a customer returning an invoiced product? Or receiving a damaged product?
The list goes on and on but we have covered the necessities. We will leave the rest to you to discover - we wouldn't want to spoil all the fun, now would we?
Some Background from the Math World
If you are really excited about recursion and the data structures created as a result, you might want to Google around for 'B-tree graph', 'directed acyclic graph' and 'multiple inheritance'.
In a nutshell, B-tree and directed acyclic graphs can be used to represent the relationships between records associated with each other in a recursive table structure. The difference between the two is 'multiple inheritance'.
B-tree graphs correspond to one-to-many recursion. Figure 10.24 shows a b-tree graph of our org chart records. The circles (also called vertices or nodes) represent specific records. The lines (also called edges) are the relationships between the records. Notice that this is different than an ERD because it is based on data in the system. Therefore, it represents actual relationships between specific records, whereas an ERD represents potential relationships between types of records.
Figure 10.24 B-tree graph of employee data.
Directed acyclic graphs correspond to many-to-many recursion. Great, but what the heck does 'directed acyclic' mean? When the edges of a graph have a direction, the graph is considered a 'directed graph'. When no vertex can be reached from itself along a directed path then it is 'acyclic' (i.e. there are no cycles).
Check this out for yourself by referring to Figure 10.25. Pick any circle and follow a line out of it in the direction of the arrow. Once you reach the next circle, do it again. Keep doing this and you will eventually end up in a circle that has no outgoing arrows. That is because the graph has no cycles. Remember, cycle is another word for infinite loop, so a directed acyclic graph is perfect for representing data that is ordered and does not have infinite loops.
The notable distinction between B-tree and directed acyclic graphs is that directed acyclic graphs allow more than one parent of a given vertex - the vertices on a B-tree graph must have one parent (or none, if it is the root node).
Another way of saying this is that B-tree graphs only allow 'single inheritance' and directed acyclic graphs allow 'multiple inheritance'. This is a much bigger deal in the world of object oriented programming than relational database design, but we figured since we're totally geeking out, we'd throw it in.
So, to recap:
One-to-many recursion only allows for single inheritance and results in a B-tree data structure
Many-to-many recursion allows for multiple inheritance and results in a directed acyclic data structure
Figure 10.25 Directed acyclic graph of the data in the Inventory system.
Summary
In this chapter we have seen two types of recursive data structures, one-to-many and many-to-many. We have described how to create a Company Org chart solution to illustrate the nuances of one-to-many recursion, and an Inventory system to illustrate many-to-many.
These are not the only types of recursive data structures that you will encounter, and they are not the only kinds of recursion we will cover in this book. We will discuss recursive portals in chapter 9, recursive scripts in chapter 11, and recursive custom functions in chapter 13.
Recursion is tough to get accustomed to at first, but once you have a grasp of the potential, you will chafe in situations where it is not an option. We hope we have whetted your appetite for recursion enough for you to struggle with it until it becomes second nature.